SUPPORT
Metrics in Datadog appeared to stop reporting in dashboards
Last update:
February 20, 2025
Only applicable for:
- DMI (iocs_dmi), version
- DMI legacy (mulesoft_anypoint), version
- OS: Windows and Linux
Scenario:
The Datadog Mulesoft Integration (DMI) stopped sending metrics to the Datadog Platform dashboards, even though the agent status is active and enabled.
Solution:
Linux
-
Check if the Datadog agent is installed. Run the following command to verify the agent's status:
`sudo systemctl status datadog-agent` -
Confirm the integration is installed and error-free. Run the following command to check for any installation or configuration issues:
`sudo datadog-agent status`Optional: If the integration is not listed or you see the following message
'unable to import module <dd-integration>: No module named <dd-integration>', follow the installation steps. -
Restart the Datadog agent, after restarting, monitor your dashboards to ensure the data is being displayed correctly.
`sudo systemctl restart datadog-agent` -
Verify that the agent restarted successfully
`sudo systemctl status datadog-agent` -
Check the integration status.
-
Ensure that the integration appears in the list and that there are no warnings or errors.
`sudo datadog-agent status`
Windows
Follow these steps using the UI provided by Datadog for Windows.
-
Check if the Datadog agent is installed
-
Open the Datadog Agent Manager it should be listed in windows apps and verify that the agent is running
-
-
Confirm the integration is installed and error-free
-
In the Agent Manager, navigate to the Status section and check if the integration is listed.
Optional: If the integration is not listed or you see the following message
'unable to import module <dd-integration>: No module named <dd-integration>', follow the installation steps. -
-
Restart the Datadog Agent.
-
Verify that the agent restarted successfully.
-
Check the integration status.
-
Ensure that the integration appears in the list and that there are no warnings or errors.
-
SUPPORT
APM Connector Compatibility
Last update:
February 17, 2025
SUPPORT
Updating DMI4APM Configuration File on Windows
Last update:
February 12, 2025
Only applicable for
- DMI4APM version: 2.X.X
- OS: Windows
Scenario:
Once the DMI4APM integration and its associated Java process is running successfully, updating configuration file (conf.yaml) does not reflect immediately. To ensure that the new configuration values are applied correctly, follow these steps.
Steps to apply configuration changes
- Locate the associated Java process.
- Confirm the PID of the Java process. You can check our apm.log to get the PID. (C:\ProgramData\Datadog\logs\apm.log)
- Open Task Manager and look for any running Java Processes.
- Terminate the associated Java process from the Task Manager. Traces will stop flowing into Datadog.
- Stop the Datadog Agent.
- Update the configuration file
- Navigate to the integration folder configuration in your Datadog Agent installation directory (C:\ProgramData\Datadog\conf.d\iocs_dmi4apm.d\conf.yaml).
- Open conf.yaml and make the necessary modifications.
- Save the file.
- Restart the Datadog Agent.
- Confirm the associated Java process is running from the Task Manager.
SUPPORT
Possible Errors
Last update:
July 17, 2024
Errors
Updating to APM Connector 3.0.0 could cause you to face some type of errors and here we will explain how you can handle them.
Null values
When you define where your trace information is in your operation you need to specify from where to take it. This could bring some issues if you use DataWeave to resolve the value and that value is null. You will see the next error message in that case.

How to handle this error?
You can validate the value using a default value to avoid getting null. You can use the next DataWeave expression as an example
Logs and traces not correlating
If you are having the problem that your application does not show the relations with its logs could be due to they are not correlated correctly
That means your Log4j2 configuration properties MUST match with your configuration set in your APM Global Configuration in next fields:
- env
- Service
- Version
Those three fields must match in order to show correctly the connection between logs and traces.
Examples
- The next is an example of a fully configured APM Connector with distributed tracing.
- A create span connector with no distributed tracing, next is the general tab
Distributed tracing tab

SUPPORT
How to migrate to 3.0.0
Last update:
July 17, 2024
We know that you probably come from an older version of APM Connector, if that is your case read the next topics to learn how to migrate to the 3.0.0 version
2.X.X to 3.0.0
When you are migrating from a 2.X.X version to a 3.0.0 you need to follow the next steps to be able to use correctly next versions.
- First, you need to update your dependency on the pom.xml file to 3.0.0 version.
- Target variable must be stored the result of a create and update operations in a new variable, please review notes below and you can also have further details in the Best Practices article here
1.X.X to 3.0.0
When you are migrating from a 1.X.X version to a 3.0.0 you need to follow the next steps to be able to use correctly next versions
- First, you need to update your dependency on the pom.xml file to 3.0.0 version.
- The next thing to do is to update your host and port in your global configuration to aim for the correct server.
Note:
Target variable: the Target variable must be stored the result of a create and update operations in a new variable. Using the connector like that you will avoid problems of overwriting your payload. You can see the next screenshot as an example to define your variable. You can name your variable in the way you wish but we recommend using a name clearly and easily identifiable
SUPPORT
How to Distribute Spans to Other Apps
Last update:
July 16, 2024
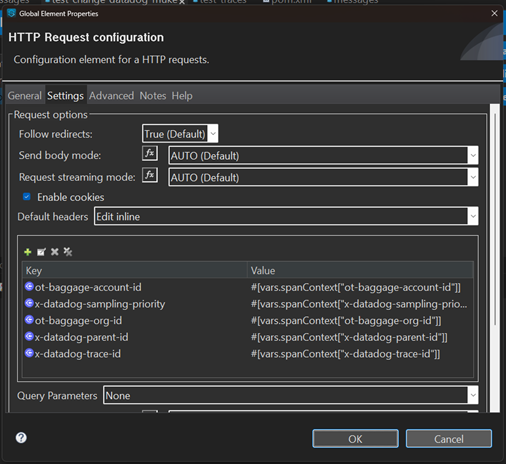
Send your span context via headers. Here are three methods:
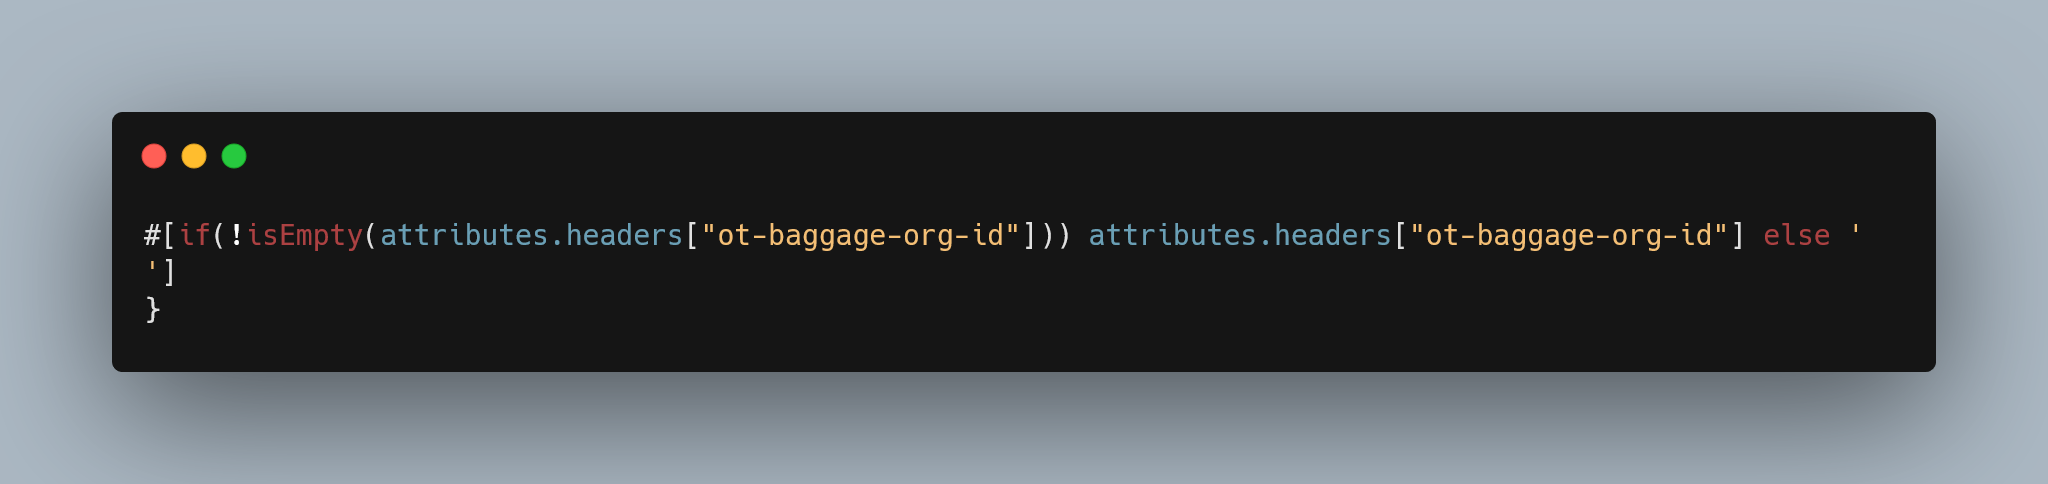
- As a DataWeave Function: Send all properties as an object.
If you need to add your custom headers you can use the next option as an example

- As a Table: Add headers one by one in Anypoint Studio.
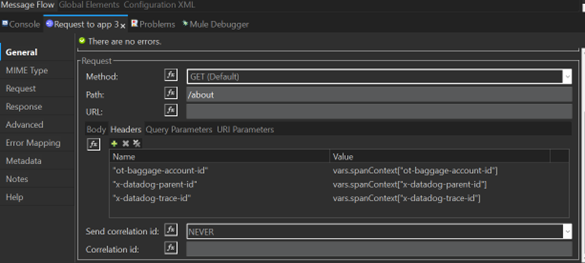
- With Default Headers: Configure headers in HTTP Request configuration.
SUPPORT
Recommendations Using the APM Connector 3.0.0
Last update:
July 16, 2024
We have a list of recommendations or good practices when you are using the APM Connector 3.0.0, we highly recommend following them.
- Target variable: We recommend always storing the result of a create and update operations in a new variable. Using the connector like that you will avoid problems of overwriting your payload. You can see the next screenshot as an example to define your variable. You can name your variable in the way you wish but we recommend using a name clearly and easily identifiable

- Version property in Global config and Log4j2: When you define the version in your global configuration that means that you will add a tag “version” in all your traces. But what if you want to add a Log operation to succesfully correlate both traces and logs you need to match the properties of your tags in traces and log configuration, this includes adding a version property. You can follow the example in the Global config new property: “version” section, for further details please visit Global Elements and Log4j section.
- Injection of baggage items with DataWeave function: You can use a DataWeave expression to send a variable that resolves in an object of key/value pair. This will help you to get all your properties at once instead define one by one each of your propagated tags.
- Propagations of baggage items with DataWeave function: You can use a DataWeave expression to send a variable that resolves in an object of key/value pair. This will help you to send all your properties at once instead set one by one each of your propagated tags.
DATADOG MULE® INTEGRATION
K8 Kubernetes
Prerequisites:
-
Have a running Kubernetes cluster on AWS (e.g., using Amazon EKS).
-
Ensure that kubectl is installed and configured to interact with your Kubernetes cluster.
-
Make sure you have a Datadog account and access to your API Key and APP Key.
Deploy an Agent with the Operator
1. Install the Datadog Operator:
-
helm repo add datadog https://helm.datadoghq.com
-
helm install my-datadog-operator datadog/datadog-operator
2. Create a Kubernetes secret with your API and app keys
-
kubectl create secret generic datadog-secret --from-literal api-key=<DATADOG_API_KEY> --from-literal app-key=<DATADOG_APP_KEY>
Replace <DATADOG_API_KEY> and <DATADOG_APP_KEY> with your Datadog API and application keys.
3. Create a file.
-
datadog-agent.yaml
with the spec of your Datadog Agent deployment configuration.
The simplest configuration is as follows: Replace <DATADOG_SITE> with your Datadog site.
Your site is datadoghq.com. (Ensure the correct SITE is selected on the right).
init_config:
  global:
    site: datadoghq.com
    credentials:
      apiSecret:
        secretName: datadog-secret
        keyName: api-key
      appSecret:
        secretName: datadog-secret
        keyName: app-key
  override:
    clusterAgent:
      image:
        name: gcr.io/datadoghq/cluster-agent:latest
    nodeAgent:
      image:
        name: gcr.io/datadoghq/agent:latest
  features:
    apm:
      enabled: true
    hostPortConfig:
      enabled: true
    eventCollection:
      collectKubernetesEvents: true
    npm:
      enabled: true
    logCollection:
      enabled: true
      containerCollectAll: true
    liveProcessCollection:
      enabled: true
    externalMetricsServer:
      enabled: true
    liveContainerCollection:
      enabled: true
    orchestratorExplorer:
      enabled: true
4. Deploy the Datadog Agent with the above configuration file:
-
kubectl apply -f /path/to/your/datadog-agent.yaml
5. Monitoring Your Kubernetes Cluster in Datadog:
-
Log in to your Datadog account and navigate to the "Infrastructure" > "Host Map" view.
-
You should see your Kubernetes nodes listed here and be able to view metrics and logs from your cluster.

6. Final Remarks:
-
Remember to customize your Datadog Agent configuration to suit your specific needs, including adding additional integrations, tags, and labels as necessary.
-
You can also enable Datadog's APM and Log Management features to monitor your applications and logs more comprehensively.
Datadog Mule Integration 4 APM
How to install
Installing a Run the sample tracing applications
Sections:
- Installing and execution
Getting the APIs required
Please download and import in Anypoint Studio each of the 4 APIs jars:
- Experience marketing-eapi https://cdn.ioconnectservices.com/cdn/docs/Datadog-APM-Connector/examples/datadog_apis/marketing-eapi-1.0.0.jar
- Process messaging-papi: https://cdn.ioconnectservices.com/cdn/docs/Datadog-APM-Connector/examples/datadog_apis/messaging-papi-1.0.0.jar
- System contacts-sapi: https://cdn.ioconnectservices.com/cdn/docs/Datadog-APM-Connector/examples/datadog_apis/contacts-sapi-1.0.0.jar
- System twilio-sapi: https://cdn.ioconnectservices.com/cdn/docs/Datadog-APM-Connector/examples/datadog_apis/twilio-sapi-1.0.0.jar
Exchange configurations
Once all the APIs have been downloaded, we need to set up some Exchange configurations.
1. Ensure you have the Datadog APM Connector publish as an asset in your company's Anypoint Platform Exchange.
2. For each one of the APIs imported, update the pom.xml file by replacing every {ORGANIZATION_ID} with your own Anypoint Platform organization ID.
3. In your local maven installation open your settings.xml file. Add your Anypoint Plataform username and password inside the "<servers>" tag. Your server ID in the settings.xml file needs to match exactly with your repository ID in the pom.xml file. You can skip this step if you already have it configured.
4. Anypoint Studio should be able to start downloading the connector from your company's Exchange into your projects. If not happening automatically, please make an update in your pom.xml file or close and reopen each project.
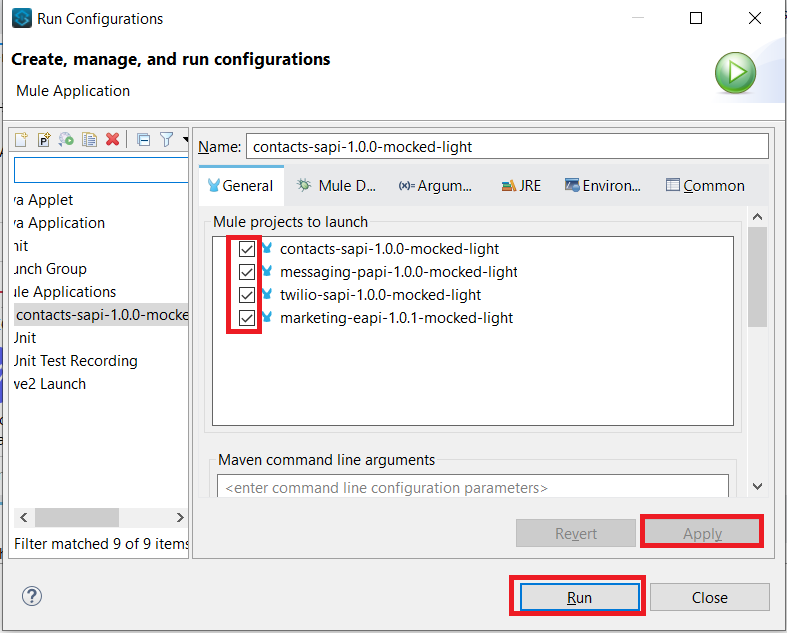
Preparing the run configurations
Once you have all 4 APIs projects imported, and configurations applied, go to Run > Run configurations...
Select all projects to run them simultaneously.
In the Arguments tab in the Program arguments box, put the following:
-Denv=local
In the VM Arguments box, put the following (and please replace dd.host and ddApiKey values with your own):
-Ddd.host={place here your host ip, sample: 127.0.0.1}
-DddApiKey={place here your api key sample: abcdefg123456}
-Ddomain=localhost
-DddAppName1=marketing-eapi-dev
-DddAppName2=messaging-papi-dev
-DddAppName3=contacts-sapi-dev
-DddAppName4=twilio-sapi-dev
-DddService1=marketing-eapi-dev
-DddService2=messaging-papi-dev
-DddService3=contacts-sapi-dev
-DddService4=twilio-sapi-dev
Execution of the APIs
Once installed, use the following curl command to execute the APIs from the Marketing EAPI (please note, calls made by the example APIs shared in this page are just mocked calls).
curl --location --request POST 'http://localhost:8081/api/messages' \
--header 'Content-Type: application/json' \
--data-raw '{
  "contactId": "a0f901f1-9105-4c06-9ec6-82f91a963d9c",
  "body": "Demo 10/11 - 001"
}'
The Marketing EAPI should return an HTTP status code 201 as a successful response.
Now that the transaction has been executed, you should be able to track the event with the correlation ID in your Datadog instance, which is shared across all systems, in the Datadog > Logs section. Take the below image as a reference of what you would be able to find in your Datadog instance.
Datadog Mule Integration 4 APM
Operations
Create Span
The create span operation as states, creates a new span in the flow, it will run in the flow until it gets finished. A span can contain Children, and those Children as well can contain Children and so on, this is useful to add granularity to the project.
The operation looks like this:
-
Display name: By default is displayed as Create Span.
-
Connector configuration: This is where the Datadog Global Configuration is set, required.
-
Span name: required.
-
Parent: The parent of the created span, optional.
-
Finish this span at the end of the main flow: This checkbox ensures that the span will be closed automatically at the end of the flow execution, the default is unchecked.
-
Tags: These are key-value pairs that can be set Inline or with DataWeave expressions, this provides labels attached to the spans that are created in execution time, optional.
-
HTTP Request Tags: Additional info the user can provide to the span, in this case the HTTP Method and the URI Path in case the user may require it for REST Services. Accept DataWeave expressions as well as static values. optional.
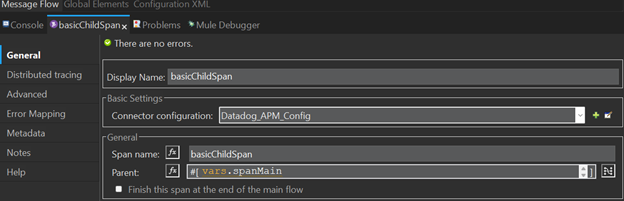
The following is an example of how to assign a child span to a parent. This flow will be used as the main example thoughout the different operation explanations. Let’s check how this can be useful.
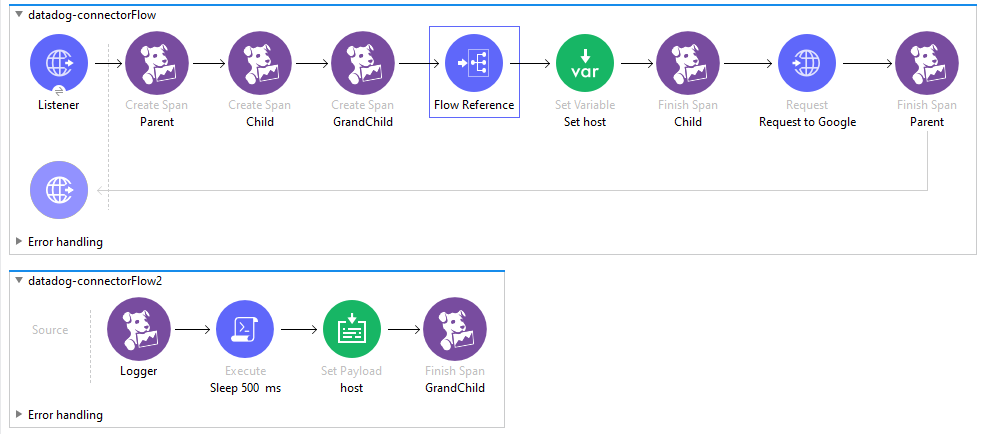
There are 3 spans created in the flow: Parent, Child, and GrandChild
The main span is called Parent, then in the Child span we assign the Parent field as Parent, which is the name of the first span created, and finally, we assign GrandChild span Parent field as Child.
With this we have the following hierarchy:
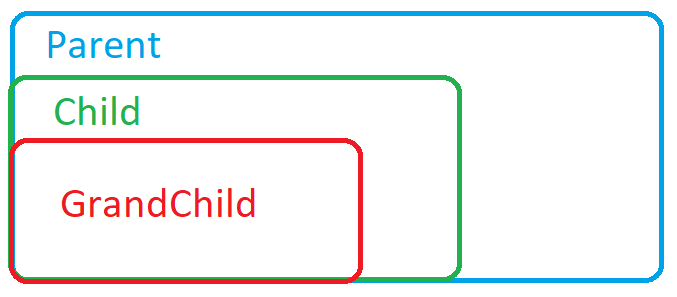
Parent will contain Child, at the same time Child will contain GrandChild.
If we run the following flow and go to the Datadog APM, the result is this trace:

And here the spans created:
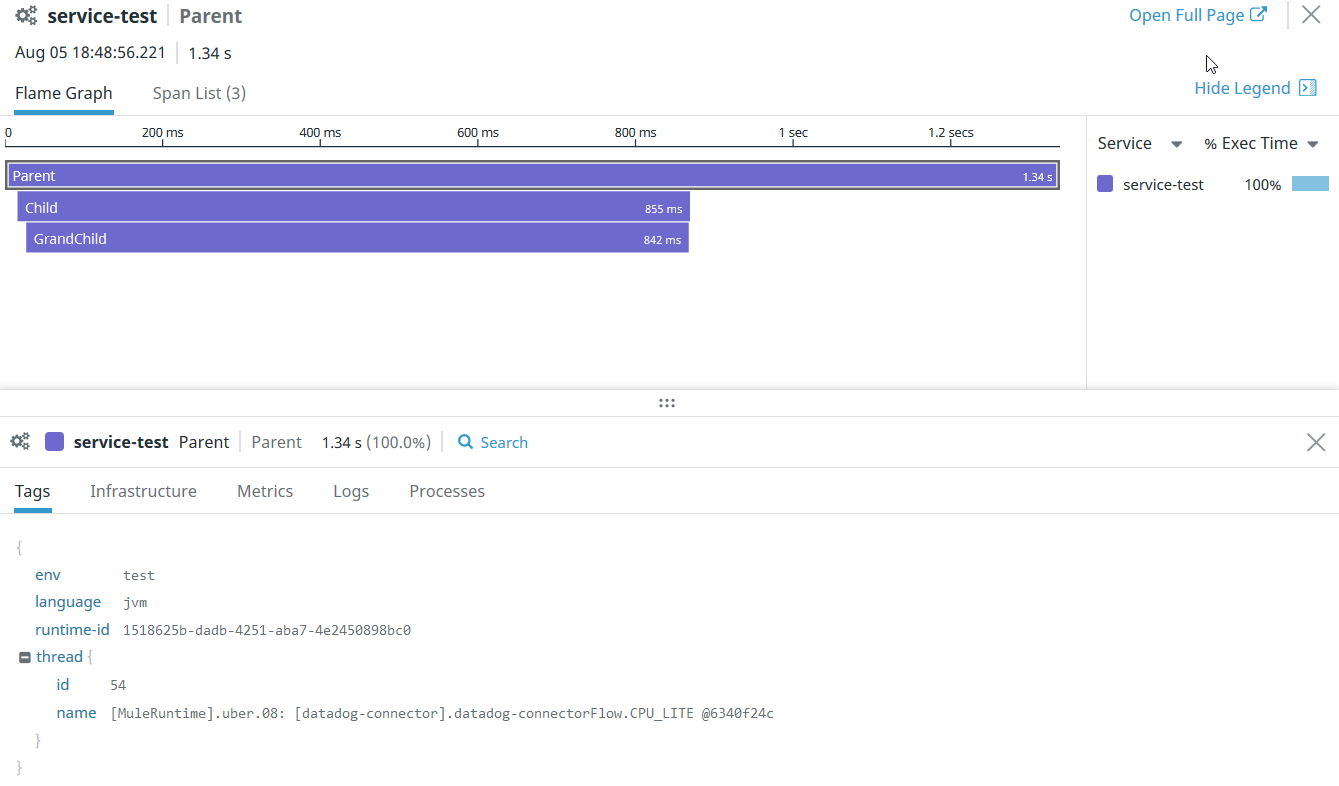
As you can see, Child and GrandChild are nested to the Parent. Nesting can have n level.
The Create Span element sets a Span with a name, this span will run as soon as is created in the flow, can have a parent and fields for tags.
<flow name="datadog-connectorFlow" >
    <datadog-apm:create-span config-ref="Datadog_APM_Config" spanName="Span" parent="Parent of this span" method="GET" path="/services/traces" autofinish="false">
        <datadog-apm:tags >
            <datadog-apm:tag key="key" value="value" />
        </datadog-apm:tags>
    </datadog-apm:create-span>
</flow>
Distributed tracing

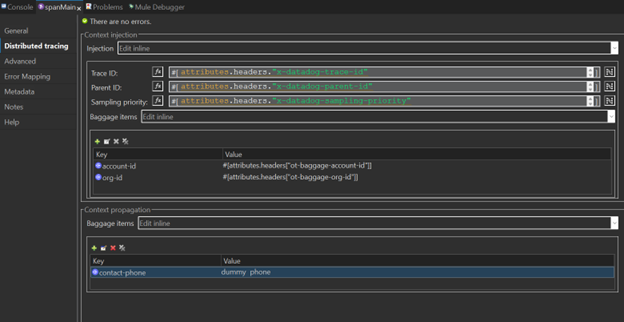
Context Injection
- None: No injection information.
- Edit Inline: Define properties for trace information.
- Trace ID: (Required) to specify the trace ID of the propagated trace to correlate the trace to be created
- Parent ID: (Required) to specify what ID is our parent, we need the parent ID to successfully create the context of the trace to create.
- Sampling Priority: Used for sampling rules by priority contains a numeric value
- Baggage Items: The Baggage items are the tags propagated from other traces to your trace to create. This is a Map of string, string, representing the key and value to get the baggage items. A common example of a propagated tag could be orderId or customerId.

Note: Ensure baggage item values are not null. Use DataWeave expressions with “#[]” for transformations.
Context Propagation
The context propagation section is where you will set the tags you want to distribute. All the tags defined here will be shown in Datadog platforms as normal tags but also will get in the Create Operation response with the next format “ot-baggage-TAG-NAME”, and you can use it to propagate to your other apps.
When you set baggage items you can define it as next. The baggage items in context propagations is a Map of string, string, representing the key and value. A common example of a propagated tag could be the correlationId or customerId.

Note: If you set a property to define a baggage item you need to ensure that the value is not null.
DataWeave expressions are not set by default, you need to define the “#[]” before using a DataWeave transformation.
Parameters
|
Name |
Type |
Description |
Default Value |
Required |
|---|---|---|---|---|
|
config-ref |
Configuration |
Global configuration element of the operation |
|
x |
|
spanName |
String |
Name of the span to be created |
|
x |
|
parent |
String |
Name of a span that will act as the parent of the one created in this operation |
|
|
|
method |
String |
HTTP Method to be inserted in the span |
|
|
|
path |
String |
Path to be inserted in the span |
|
|
|
tags |
Map |
Key-value pair of tags that can be inserted in the span |
|
|
|
autofinish |
Checkbox |
Indicates if span will be auto finish at the end of the flow |
false |
|
|
Trace ID |
String |
Trace ID for context propagation |
|
x |
|
Parent ID |
String |
Parent ID for the next trace |
|
x |
|
Sampling priority |
Int |
Used for sampling rules and rates |
|
|
|
Baggage items |
Map |
Tags distributed through all spans |
|
|
|
Baggage items |
Map |
Tags distributed through all spans for context propagation |
|
|
Output
“Create Span” Operation now returns a HashMap Object
In APM Connector versions < 3.0.0 the Create operation returns a void element, but this changed with this update. Now we return a HashMap object of a key, value pair representing the span context of the created object. The objective of this have the ability to distribute the span to different applications. This means we will be able to propagate our trace updates in our apps.
When you use the Create operation you will get the next parameters. They are the same fields that you get with the create operation:
- x-datadog-trace-id: this field has the trace id. You will use this trace ID to propagate the context to other apps and correlate the next trace to be created
- x-datadog-parent-id: You can use this field to specify the parent of the next traces.
- x-datadog-sampling-priority: This property is used when you are using sampling rules and rates.
- ot-baggage-…: All elements starting with “ot-baggage-“ are tags that will be distributed through all our spans.

Note: Since the Update operation now returns an object, the payload will be overridden. Store the result value in a target variable. See the "Recommendations Using the APM Connector 3.0.0" article.
Finish Span
The Finish Span element finishes a span already created in the flow, sending this span to the Datadog APM view with its respective timestamps, contains the global configuration and the span name to be finished.
<flow name="datadog-connectorFlow" >
    <datadog-apm:finish-span config-ref="Datadog_APM_Config" spanName="Span to be finished" error="false" statusCode="200"/>
</flow>
Parameters
|
Name |
Type |
Description |
Default Value |
Required |
|---|---|---|---|---|
|
config-ref |
Configuration |
Global configuration element of te operation |
|
x |
|
spanName |
String |
Name of the span to be finished |
|
x |
|
error |
Boolean |
Check if the span is marked as error |
false |
|
|
statusCode |
Integer |
Set the status code of a span if stated |
|
|
Update Span
The Update Span element updates a span already created in the flow, adding tags to add more optional information between the creation and closure of it.
<flow name="datadog-connectorFlow" >
    <datadog-apm:update-span config-ref="Datadog_APM_Config" spanName="Span to be updated"/>
</flow>
Parameters
|
Name |
Type |
Description |
Default Value |
Required |
|---|---|---|---|---|
|
config-ref |
Configuration |
Global configuration element of the operation |
|
x |
|
spanName |
String |
Name of the span to be updated |
|
x |
Output
“Update Span” Operation now returns a HashMap Object
In APM Connector versions < 3.0.0 the Update operation returns a void element, but this changed with this update. Now we return a HashMap object of a key, value pair representing the span context of the created object. The objective of this have the ability to distribute the span to different applications. This means we will be able to propagate our trace updates in our apps.
When you use the Update operation you will get the next parameters. They are the same fields that you get with the create operation:
- x-datadog-trace-id: this field has the trace id. You will use this trace ID to propagate the context to other apps and correlate the next trace to be created
- x-datadog-parent-id: You can use this field to specify the parent of the next traces.
- x-datadog-sampling-priority: This property is used when you are using sampling rules and rates.
- ot-baggage-…: All elements starting with “ot-baggage-“ are tags that will be distributed through all our spans.
Note: Since the Update operation now returns an object, the payload will be overridden. Store the result value in a target variable. See the "Recommendations Using the APM Connector 3.0.0" article.
Activate Span
The Activate Span element sets a span as the new active one, measuring all the current performance in the flow, contains the global configuration and the span name to be activated.
<flow name="datadog-connectorFlow" >
    <datadog-apm:activate-span config-ref="Datadog_APM_Config" spanName="Span to be activated"/>
</flow>
Parameters
|
Name |
Type |
Description |
Default Value |
Required |
|---|---|---|---|---|
|
config-ref |
Configuration |
Global configuration element of the operation |
|
x |
|
spanName |
String |
Name of the span to be activated |
|
x |
Finish All
The Finish All element sets all the spans created to finished at once, this operation is executed based on a LIFO structure, contains the Global configuration
<flow name="datadog-connectorFlow" >
    <datadog-apm:finish-all config-ref="Datadog_APM_Config"/>
</flow>
|
Name |
Type |
Description |
Default Value |
Required |
|---|---|---|---|---|
|
config-ref |
Configuration |
Global configuration element of the operation |
|
x |
Logger
The Logger element creates information to be logged to the stated span in the Span Name field, sending information that can be consulted in the Datadog APM view, contains the Global configuration, the span name, a message, the logging level to be chosen, and the category. This logger operation is designed to help correlating the produced log with the parent trace Id in Datadog APM.
<flow name="datadog-connectorFlow" >
    <datadog-apm:log config-ref="Datadog_APM_Config" spanName="span to be logged" message="message" category="category of the log" level="ERROR"/>
</flow>
|
Name |
Type |
Description |
Default Value |
Required |
|---|---|---|---|---|
|
config-ref |
Configuration |
Global configuration element of the operation |
|
x |
|
spanName |
String |
Name of the span in which the logs will be inserted |
|
x |
|
message |
String |
Message to be inserted in the span |
|
x |
|
level |
Enumeration, one of:
|
Logging level of the log |
INFO |
|
|
category |
String |
Label to classify the log |
|
|